Saturday, February 22, 2014

Lakota Sioux C-13

This is a very pretty block and is the only block that requires 3 fabrics.  The construction was very time-consuming and a bit frustrating, and the finished block is a bit wonky.

Difficulty clues: 5 sections, 25 fabric pieces, 3/8th inch finished size for several pieces.


Yep, the wonky element is there already in the lower 2 triangles.


I thought I would try to fix the uneven seam where the wood iron is pointing...


After several resews, I declared a truce and finished it.  It meets the criteria of "good enough!"


Here is the white quilt version laid out.

Sections sewn together.  My quality level is reduced for the 2nd version, so it's not as frustrating as the 1st!


And here are the finished blocks, finally!

My next post will be Cathedral Window, D-5,another block with an inner square on-point.

Friday, February 21, 2014

Rising Sun E-5

Ever since I saw Doreen demonstrate this block in class I've been eagerly anticipating making this block.  It fascinates me with its rays radiating from the center circle.  This is my 51st block, the 4th from January's blocks, and I decided to see if I could make it in the hour or so I had before heading off to the February class.

Doreen did a great job of providing cutting instructions, taking care to note that half the rays are longer than the other half.  She is so good at saving fabric when she gives cutting directions.

Although there are 17 pieces to this block, there are only two sections and one easy applique, so I hope it will sew up quickly.


Here is the difference between an unpressed seam and a pressed seam. In the unpressed seam there is a substantial curve of fabric that can be seen at the two ends of the seam--at least 1/8 inch of fabric billows out from the seam.  If this is left unpressed, it will definitely affect the accuracy and how the pieced section finishes up.


Here is the pressed seam.  Notice that you can see almost right down to the stitches in the seam.  This is now an accurate seam and will not distort the layout of the pieced section.  I used the wooden pressing stick edge to open up the seam.


Here are the two sections, mirror images of each other, not trimmed in any way.  I'll trim only the straight edge that joins the two sections.  The way Doreen set up the order of sewing ensures all the seams will flow in the same direction when the two sections are sewn together.  I chose not to sew the seams down to the center point, because 7 seams meeting at the center would be very bulky.  This area will be covered by the appliqued circle anyway.


I use two pins to line up the circle and seam intersections.


I use the Dear Jane square ruler to trim the outer edges.  This ruler is the companion to the triangle ruler and is a MUST when making this quilt!  I focus on the 4 points where the outer edge seams come together to line it up.


After years of avoiding and dreading anything involving applique, I now love it!  I consistently use one of the several applique techniques Doreen taught us.  It is totally reliable, avoiding all frustration, and uses wash-away fusible and basting glue.  One other tool that makes it so easy are these tweezers that came with my Bernina 830 machine.  The tips are angled just right to grab the tiny fabric pieces to pull over the fusible, then I use the flat edges to coax the folds into a smooth edge. 


Here is the block ready for hand sewing the applique piece.  What a terrific block--so wonderfully graphic--very symmetrical.


Here is the white quilt version.  It occurred to me that it would be prudent to trim the block after appliqueing the center circle in order to avoid fraying.  Also note that two of the tips are right at the edge of the fabric, testament to the necessity to line up the fabric pieces very carefully and test before sewing!


Completed blocks.


My next post will be about block C-13, the 'Lakota Sioux' block.  This block looks complicated!


Wednesday, February 19, 2014

Tennessee Valley triangle for white quilt

Today I'll cover how to sew sections together.  Here are the 3 sections of this block ready to sew together.  Notice that the inside edges of the two top triangle sections to be joined are trimmed, but not the bottom edges.  The bottom edge won't be trimmed until the two sections are joined and ready to be sewed to the bottom base section.


This picture shows the seam edges on the back of each section pointing in opposite directions, which will allow the new seam of the sections to nest together. I've started to pin the sections together, taking advantage of the little ditch at the seam.


Here you can see the pins are piercing the fabric just to the left of the stitched seam.

On the other section, the pins are piercing just to the right of the seam.  This placement of the pins ensures that the pins are exactly in the ditch and will help join the stripes at exactly the right point. The pins locating the exact joining points are standing up, and will be removed after I've placed more pins outside the stitching line.  This will avoid distorting the stitching line.


These are the pins joining the stitching line.  Now that I've pinned outside the stitching line, these are ready to be removed.


When I join sections together, I do not stitch exactly on the printed line.  I stitch just to the inside, resulting in an ever so slightly smaller seam allowance to account for the bulk of the joined sections.


I'm happy with how the stripes meet in the seam.  I pressed the seam open on the back.  Now it's time to join the top triangle sections to the bottom base section.


I trimmed the bottom of the triangle section, ensuring the cut was perpendicular to the middle seam. I pinned the two sections together keeping the cut edges exactly even and placing the pins away from the sewing line to avoid distortion.  Again, I stitched just inside the printed line.


I kept the points of the white triangles in the base section, but I'm not so happy with the point my index finger is pointing at.  I ripped out the seam (very carefully!!!) just to about a quarter of an inch to the left of this point and repinned and resewed.  It came out better, but still not perfect.  In other words, it came out good enough!

Time to trim the entire triangle using the Dear Jane Triangle by Brenda Papadakis (ezQuilting at www.simplicity.com).  I take a lot of time lining up the triangles and blocks.  So far in making this quilt, the squares and triangles don't ever line up exactly, so there are compromises to be made.  Today, it looks pretty darn good.  I'm especially pleased that all the seams are in the right places and are very straight with no wonkiness.  I use a rotating mat, such a handy tool when you have to cut all 4 sides of something.

Here are the two Tennessee Valley triangles.  See the slight wonkiness of the very bottom seam in the black triangle?  But as is noted on the Dear Jane Triangle, "Finished is better than perfect!"  (And this little saying is trademarked!)


The finished blocks are tucked away in their own baggy with their pattern inside for future Dear Jane quilts!


Finally, I get to put a little sticker on my design patterns to indicate that this block is finished.  Below are the patterns for the white and black quilt, respectively.  The pinned squares on the bottom left are the colors for the triangles.

I've finished all the blocks and triangles for December, a total of 47 (but really 94, since I'm making 2 quilts).  Now on to January!

Tuesday, February 18, 2014

Tennessee Valley triangle block (RS1)

I've finished all the blocks for October through December for my Dear Jane quilt class except one, which I'm working on today.

It's a triangle block called Tennessee Valley.  It's located on the right side, 1st position (RS1).  I've completed the block for the black background quilt.  It looks like this:


This block is sewn using foundation paper piecing, a technique I learned in this class.  This is a terrific technique, but it does have its own set of skills to master in order to get perfect blocks.  This block has 3 sections.  The challenge with this block is to get the stripes to match at the center seam, where two sections are joined.  Notice in the picture below that the order for sewing the background and the colored fabric alternates for each section; one begins with 1 at the bottom and the other begins with 1 at the top.  This results in seams that lie in opposing directions on the back, which allows you to "nest" the seams together when sewing the two sections together, which I'll show in a subsequent post.
I've indicated on the pattern the sewing order and notated the identifying block number in each place where the colored fabric is sewn.  The patterns here don't include the seam allowances for each foundation piece.  I add this when I cut out the pattern from the foundation paper after they're printed.

For me, it's best if I arrange the cut pieces according to the paper pattern, otherwise it's so easy to pick up the wrong piece if they are just stacked up according to size.  Here, I'm working on the bottom section of the block.  You can see I added the quarter inch seam allowances around the section when I cut it out.


For fabric 1, line it up on the back of the foundation paper with the area marked RS1 1.  I use my light pad.  I try to have at least one fabric edge on a quarter inch seam allowance. In this case, the top edge is lined up with the seam that goes with the upper section of the block. Next, put a tiny dab of basting glue to hold the fabric to the back of the foundation piece.


Next, trim fabric 1 for seam 1/2 (the seam between fabric 1 and fabric 2).  On the top of the foundation piece, line up the edge of a stiff card to seam 1/2.


Then fold the foundation paper over the card.


Line up the add-a-seam ruler with the edge of the card/foundation paper.  There is fabric 1 ready to be trimmed.


Rotary cut the fabric along the ruler.


Remove the ruler and the card; turn the foundation piece over to the 1st piece of fabric.  There is the cut seam, ready for fabric 2.


Line the edge of fabric #2 along the seam line.


It looks so big for the tiny area to be covered, but with angles, it gets really tricky!  It's very easy to miss covering the entire area to be covered, and mistakes happen in the corners and future seam allowances. This is why foundation piecing is not quite as fool proof as one might think.  I learned the hard way to test the placement of the new piece by folding the fabric over a quarter of an inch and check to see that everything will be covered.  Reposition if needed and retest.
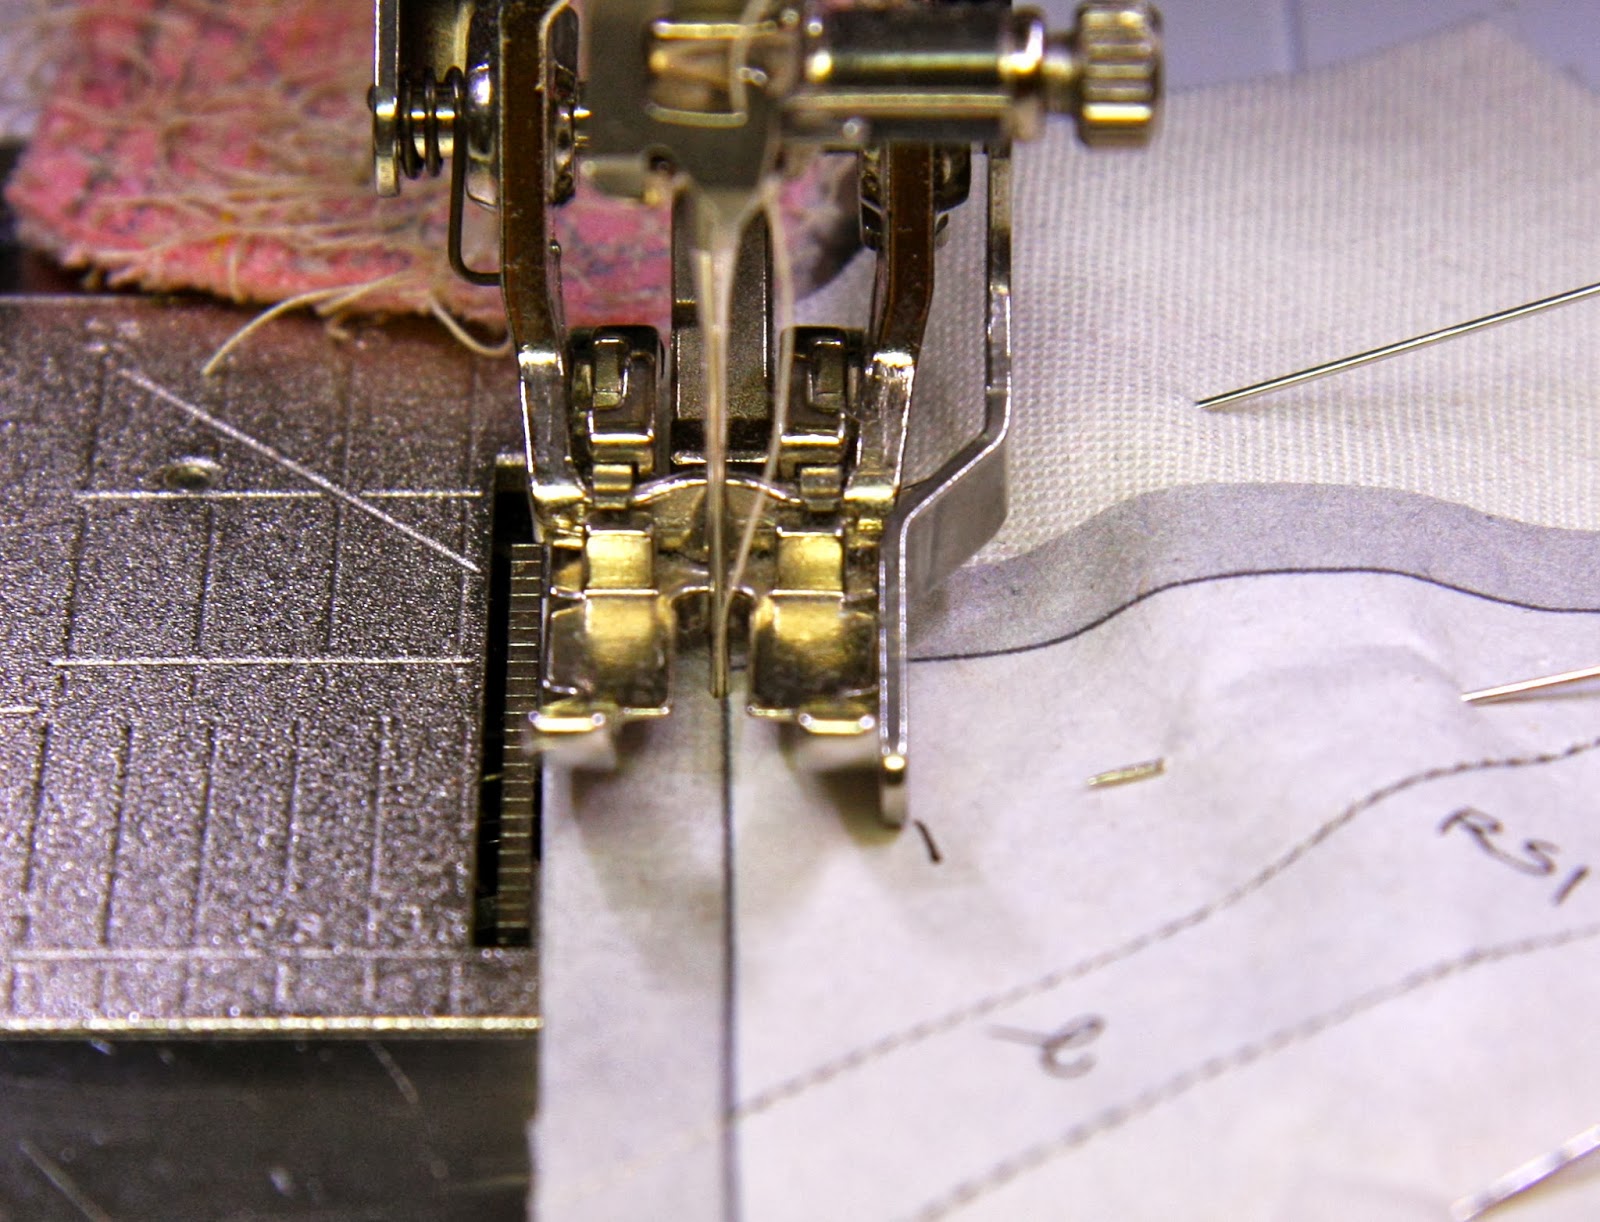
Flip it over so the printed side of the paper is up and hold tightly to the two pieces of fabric to avoid shifting. Sew the seam using a small stitch length (I use 1.5 stitch length).  I also loosen the foot tension when sewing foundation paper blocks because it helps to avoid shifting the paper/fabric sandwich.  Sew on the line, with the needle piercing the printed line exactly in the middle of the line.


I try to use a starter piece of fabric (the pink fabric with the jumble of threads) when possible to avoid problems with wonky and weak beginning stitches.  In this case I started by sewing through the seam allowance that will attach this section to the top striped section.  Notice that I stopped sewing on the seam line for #8.  This ensures an unsewn paper edge when I have to trim fabric pieces 1 thru 7 before sewing piece 8.  Clip off the starter fabric and turn it all over so the foundation paper is on the bottom.


Press using a wooden iron.  This is the perfect tool for ensuring a clean, straight edge. Use the flat angled part to push fabric #2 away from the joining seam.  You want this seam to be perfectly smooth and flat, with no fold. Use a dab of basting glue to hold fabric 2 to the foundation paper.  This keeps the fabric from popping up and being unruly when sewing subsequent seams.  My camera battery died, so I am not posting the picture I wanted to post of a flat, straight seam.  The below pic is of an un-ironed seam.
Follow this entire procedure (you won't have to use the light box again) for fabric #3 (seam 1/3) and continue till the entire section is sewn together. Remember to trim only when preparing to sew a new seam.  In other words, don't be tempted to trim future seams, for example, the seam that will connect the two sections. And be sure not to trim outside edges until the entire block is sewn together and ironed flat.  In the next post I'll show how to sew two sections together.