Thursday, October 15, 2015

Shenandoah Valley Botanical Album Quilt of 1858 Beginnings

I will refer Gentle Reader to the Shenandoah Valley Botanical Album Quilt of 1858 blog and the Virginia Quilt Museum web site for details about this lovely quilt pattern and its role in raising money for the museum in celebration of its 20th anniversary.
My quilt plan is to the right of the original.  Changes:
1. The tree and the rainbow blocks come out for pillow designs. 
2. I split the design of some blocks, duplicated and made into two different blocks.
3. Only one pineapple block.
4. 5 blocks for 5 colors: red, pink, purple, orange, yellow

Hand dyed fabrics from Ricky Tims: soft as velvet with mottled colors.

Raw edge appliqué that I plan to edge stitch and quilt using the Ricky Tims stabilizer method with bright, variegated threads.  I attended his 3 day seminar in Charlestown, WV in July and have been itching to use his appliqué methods.

Saturday, March 1, 2014

Megan's Mountain Laurel C-7

I haven't finished January, but I'm going to jump ahead to February.  Here is the way I constructed this block, using only appliqué and no piecing.


Print the pattern onto wash-away appliqué paper.  Cut out patterns for the color pieces, making sure to cut inside the lines to account for fabric thickness, & iron to fabric, lining up 2 opposite edges with the fabric grain.

Cut out leaving a small seam allowance, slightly less than 1/4 inch. Trim the seam allowance at the acute angle points.


Glue down two opposing edges.


Glue down the other two edges.


Trim the little flap so its edge is parallel to the edge of the appliqué piece.  Here, the right flap is trimmed and the left is not.


Put a tiny dot of glue on the flap & bend it over on itself with tweezers.


Check from the front & make adjustments until you no longer see the flap from the front.  Be careful not to distort the point.


For a square piece, use much the same technique. Press the wash-away pattern piece ensuring it's aligned with the straight of grain; trim the seam allowance, and glue down 2 opposing edges.

Glue down the other edges.

Glue down the tip of the overlapping seam allowances.


The back.


The fronts with nice perky points.


Lightly mark horizontal, vertical, & both diagonal lines, plus the 1/4 inch seam allowance onto the background square. Line up all the appliqué pieces according to the pattern, and lightly glue in place.

These are appliquéd but not yet trimmed.


Tuesday, February 25, 2014

Star Struck F-7

What a beautiful little star!  Four main sections, 21 fabric pieces. The seams nest beautifully when sewing the sections together.  In order not to lose the outermost points, you must take care to sew scant seams when connecting the logs.

These are so pretty in their sherbet colors. I'm missing a smidge on the uppermost left corner of the pink square, but not to worry--there's plenty for a seam later. I think I cut this piece scantily because I was running out of this color. I finally decided I had to buy another entire set of Kaffe Fassett shot cotton collection, because it would be a minor disaster if I ran out of fabric.


Next up is Ben's Bow tie H-10.

Sunday, February 23, 2014

Family Album I-3

I sewed the black background block using old fashioned piecing, and the white background using foundation piecing, just to test out the time involved and the accuracy.

For the black quilt block, it's a "slice and dice" method--you sew, then cut, then sew together a bit differently.


Sew the red strips with two black strips, cut into three pieces and add the remaining black strips.


The chop and sew method is the one on the left.  It's okay, but it's not nearly as accurate as the one on the right, which is foundation pieced.  The paper stabilizes the fabric and allows you to sew perfectly straight seams, and when you are working with 3/8 inch finished strips of fabric, you need all the help you can get.  Okay, point made and re-learned!


Meeting Place D-7

This block has terrific graphic qualities and practically sews itself!  I recommend sewing the center section in a different order than is shown below.  Sew the center square first then sew both sides.  This allows the seams to be nestled together neatly and accurately.


Not much to this blog because this was such an easy block.  This block sews together quickly and accurately.


Peek-a-boo H-1

Back to foundation piecing for this charming block.  Four sections & 20 pieces.


Oh dear, and things were going so well...


A little unsewing and now it's time to join the sections.


This block sews up fairly quickly.  Here is the black one laid out.


This is a lovely block.  I like it.  Next is a very easy block, Meeting Place (D-7).


Cathedral Window D-5

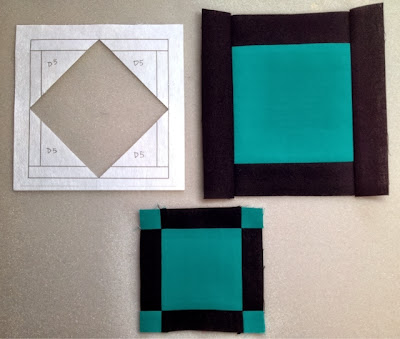
I think it's easier to construct this block using Doreen's 'piecelique' technique than using foundation piecing requiring 7 sections.  Basically, the technique involves piecing two squares and then appliquéing the smaller square to the larger square using reverse applique.  

The white square on the left is wash-away foundation with the pattern printed on it.


Piece both squares, making sure to nest the seams and open up the intersections on the back of the smaller square, and cut out the small square space from the wash-away foundation.


Iron the foundation to the back of the large square.


Cut away the inside of the opening, leaving a quarter inch allowance.  Cut at the corners right up to the point, then glue the edges to the wash-away foundation using basting glue.


The small block is centered evenly over the opening.


Carefully line up the blocks, pin and hand sew the edges exactly as you would for reverse appliqué.


After trimming with the Dear Jane Square, I'm happy with the results.  Both blocks look symmetrical, lines are straight, and points are relatively pointy.